Laravel 11 Chat App Using Reverb Broadcasting Event
Laravel reverb provides feature to integrate real time broadcasting. Reverb is used for making real time notification application, chat application as well as notify users. This article will give you a to z guideline to make chat room application using laravel reverb. Here whole article is divided into small parts or topics for easy understanding. Follow whole article and do practice. You will get done
- Install Laravel 11
- Set Up Authentication
- Install Laravel Echo & Reverb
- Create Models, Migrations & Controllers
- Broadcast Messages with Laravel Echo
- Create Chat UI with Tailwind CSS
- Listen for Messages in Real-Time
- Start Application Server and Reverb Server
Install Laravel 11 Framework
To work with chat application we will create new laravel 11 empty project and after that necessary dependencies will be installed one by one
composer create-project --prefer-dist laravel/laravel laravel11-chat
cd laravel11-chat
Setup Authentication for Login, Registration
Here in chat application only logged in users will join in chat and do conversation. That's why we need to have authentication feature. Install breeze and run related commands
composer require laravel/breeze --dev
php artisan breeze:install blade
npm install && npm run build
php artisan migrate
Install Reverb and Broadcasting
To work with broadcasting we need to install broadcasting driver reverb and necessary dependencies. Run install:broadcasting command to do it
php artisan install:broadcasting
Create Models, Migrations & Controllers
We will have to create Message model, migration and ChatController
php artisan make:model Message -m
Message Model
namespace App\Models;

use Illuminate\Database\Eloquent\Factories\HasFactory;
use Illuminate\Database\Eloquent\Model;

class Message extends Model
{
    use HasFactory;

    protected $fillable = ['user_id', 'message'];

    public function user()
    {
        return $this->belongsTo(User::class);
    }
}
Modify message migrations and add user_id foreign key to save user id.
public function up()
{
    Schema::create('messages', function (Blueprint $table) {
        $table->id();
        $table->foreignId('user_id')->constrained()->onDelete('cascade');
        $table->text('message');
        $table->timestamps();
    });
}
Run Migration
php artisan migrate
php artisan make:controller ChatController
ChatController
namespace App\Http\Controllers;

use App\Events\MessageSent;
use App\Models\Message;
use Illuminate\Http\Request;
use Illuminate\Support\Facades\Auth;

class ChatController extends Controller
{
    public function index()
    {
        return view('dashboard', ['messages' => Message::with('user')->latest()->get()]);
    }

    public function sendMessage(Request $request)
    {
        $request->validate(['message' => 'required']);

        $message = Message::create([
            'user_id' => Auth::id(),
            'message' => $request->message,
        ]);

        broadcast(new MessageSent($message->load('user')))->toOthers();

        return response()->json(['message' => $message]);
    }
}
Create Broadcasting Event
php artisan make:event MessageSent
MessageEvent class
namespace App\Events;

use App\Models\Message;
use Illuminate\Broadcasting\InteractsWithSockets;
use Illuminate\Contracts\Broadcasting\ShouldBroadcast;
use Illuminate\Foundation\Events\Dispatchable;

class MessageSent implements ShouldBroadcast
{
    use Dispatchable, InteractsWithSockets;

    public $message;

    public function __construct(Message $message)
    {
        $this->message = $message;
    }

    public function broadcastOn()
    {
        return ['chat-channel'];
    }

    public function broadcastAs()
    {
        return 'message.sent';
    }
}
Setup Routes in Web.php
use App\Http\Controllers\ProfileController;
use Illuminate\Support\Facades\Route;

Route::get('/', function () {
    return view('welcome');
});

Route::get('/dashboard', [\App\Http\Controllers\ChatController::class,'index'])->middleware(['auth', 'verified'])->name('dashboard');

Route::middleware('auth')->group(function () {
    Route::post('/chat/send', [\App\Http\Controllers\ChatController::class, 'sendMessage'])->name('chat.send');

    Route::get('/profile', [ProfileController::class, 'edit'])->name('profile.edit');
    Route::patch('/profile', [ProfileController::class, 'update'])->name('profile.update');
    Route::delete('/profile', [ProfileController::class, 'destroy'])->name('profile.destroy');
});

require __DIR__.'/auth.php';
Make UserSeeder and Run
To user existing data from userseeder class we will have to create a UserSeeder php class. This class will populate three data in users table. After that 3 users can login to system and start chatting
php artisan make:seeder UserSeeder
UserSeeder Class
namespace Database\Seeders;

use Illuminate\Database\Seeder;
use Illuminate\Support\Facades\DB;
use Carbon\Carbon;
use Illuminate\Support\Facades\Hash;

class UserSeeder extends Seeder
{
    public function run()
    {
        $users = [
            [
                "id" => 1,
                "name" => "Ariful Islam",
                "email" => "[email protected]",
                'password'=> Hash::make(12345678),
                "email_verified_at" => null,
                "created_at" => Carbon::parse('2025-02-12T09:20:22.000000Z'),
                "updated_at" => Carbon::parse('2025-02-12T09:20:22.000000Z'),
            ],
            [
                "id" => 2,
                "name" => "Tarif Hossain",
                "email" => "[email protected]",
                'password'=> Hash::make(12345678),
                "email_verified_at" => null,
                "created_at" => Carbon::parse('2025-02-12T10:01:45.000000Z'),
                "updated_at" => Carbon::parse('2025-02-12T10:01:45.000000Z'),
            ],
            [
                "id" => 3,
                "name" => "Parvej Hossain",
                "email" => "[email protected]",
                'password'=> Hash::make(12345678),
                "email_verified_at" => null,
                "created_at" => Carbon::parse('2025-02-12T10:07:15.000000Z'),
                "updated_at" => Carbon::parse('2025-02-12T10:07:15.000000Z'),
            ],
        ];

        DB::table('users')->insert($users);
    }
}
Run Seeder
php artisan db:seed --class=UserSeeder
Serve and View Application
To start application you will have to run serve command. Serve will start your project on port 8000. After that open new terminal window and run reverb:start command. Reverb start will start on default port 8080
php artisan serve
php artisan reverb:start --debug
Design UI Using Tailwind CSS
layouts/app.blade.php
<!DOCTYPE html>
<html lang="{{ str_replace('_', '-', app()->getLocale()) }}">
    <head>
        <meta charset="utf-8">
        <meta name="viewport" content="width=device-width, initial-scale=1">
        <meta name="csrf-token" content="{{ csrf_token() }}">
        <title>{{ config('app.name', 'Laravel') }}</title>
        <link rel="preconnect" href="https://fonts.bunny.net">
        <link href="https://fonts.bunny.net/css?family=figtree:400,500,600&display=swap" rel="stylesheet" />
        @vite(['resources/css/app.css', 'resources/js/app.js'])
    </head>
    <body class="font-sans antialiased" data-user-id="{{ auth()->id() }}">
        <div class="min-h-screen bg-gray-100">
            @include('layouts.navigation')

            <!-- Page Heading -->
            @isset($header)
                <header class="bg-white shadow">
                    <div class="max-w-7xl mx-auto py-6 px-4 sm:px-6 lg:px-8">
                        {{ $header }}
                    </div>
                </header>
            @endisset

            <!-- Page Content -->
            <main>
                {{ @$slot }}
            </main>
        </div>
    </body>


<script src="https://cdn.jsdelivr.net/npm/[email protected]/dist/socket.io.min.js"></script>
<script src="https://code.jquery.com/jquery-3.6.0.min.js"></script>
<script>
    $(document).ready(function () {
        window.userId = "{{ auth()->id() }}";

        $(document).on("click", '#chat-form button', function (e) {
            e.preventDefault(); // Prevent default form submission

            const messagesDiv = $("#messageDiv"); // Get the value of the message input
            const message = $("#messageInput").val(); // Get the value of the message input

            // Send message via fetch API
            $.ajax({
                url: "{{ route('chat.send') }}",
                type: "POST",
                dataType: "json",
                headers: {
                    'X-CSRF-TOKEN': $('meta[name="csrf-token"]').attr('content'),
                    "Content-Type": "application/json",
                },
                data: JSON.stringify({message: message}),
                success: function (data) {
                   // messagesDiv.append(`<p><strong>You:</strong> ${data.message.message}</p>`);
                    messagesDiv.append(`
                    <p class="text-sm">
                        <strong class="text-blue-600">You:</strong> ${data.message.message}
                        <span class="text-xs text-gray-500 ml-2">10:22:06am, 12-02-2025</span>
                    </p>
                    `);
                    $("#messageInput").val(""); // Clear the message input
                }
            });
        });
    });
</script>

</html>
dashboard.blade.php
<x-app-layout>
<x-slot name="header">
<h2 class="font-semibold text-xl text-gray-800 leading-tight">
{{ __('Dashboard') }}
</h2>
</x-slot>
<div class="py-12">
<div class="max-w-7xl mx-auto sm:px-6 lg:px-8">
<div class="bg-white overflow-hidden shadow-sm sm:rounded-lg">
<div class="p-6 text-gray-900">
{{ __("Welcome to chat, You're logged in!!") }}
</div>
</div>
</div>
</div>
<div class="max-w-lg mx-auto bg-white shadow-lg rounded-lg p-4">
<!-- Messages Container -->
<div id="messageDiv" class="mb-4 space-y-2 max-h-60 overflow-y-auto p-2 border rounded">
@foreach ($messages as $message)
<p class="text-sm">
<strong class="{{ auth()->id() == $message->user_id ? 'text-blue-600': 'text-green-600' }}">{{ $message->user->name }}:</strong> {{ $message->message }}
<span class="text-xs text-gray-500 ml-2">{{ $message->created_at->format('h:i:sa, d-m-Y') }}</span>
</p>
@endforeach
</div>
<!-- Chat Form -->
<form id="chat-form" class="flex items-center space-x-2">
<input type="text" id="messageInput"
class="flex-1 p-2 border rounded focus:outline-none focus:ring-2 focus:ring-blue-400"
placeholder="Type a message..." required>
<button type="submit" class="bg-blue-600 text-white px-4 py-2 rounded hover:bg-blue-700 transition">Send
</button>
</form>
</div>
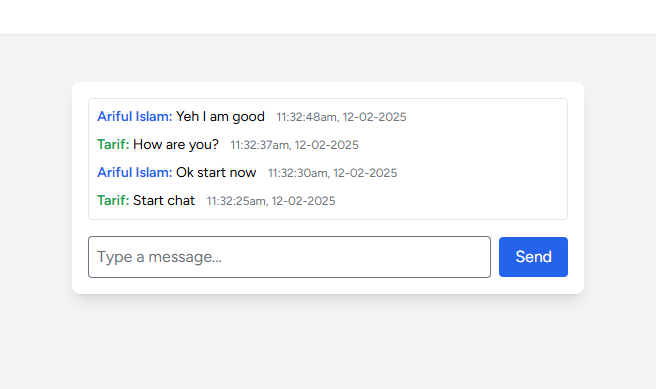
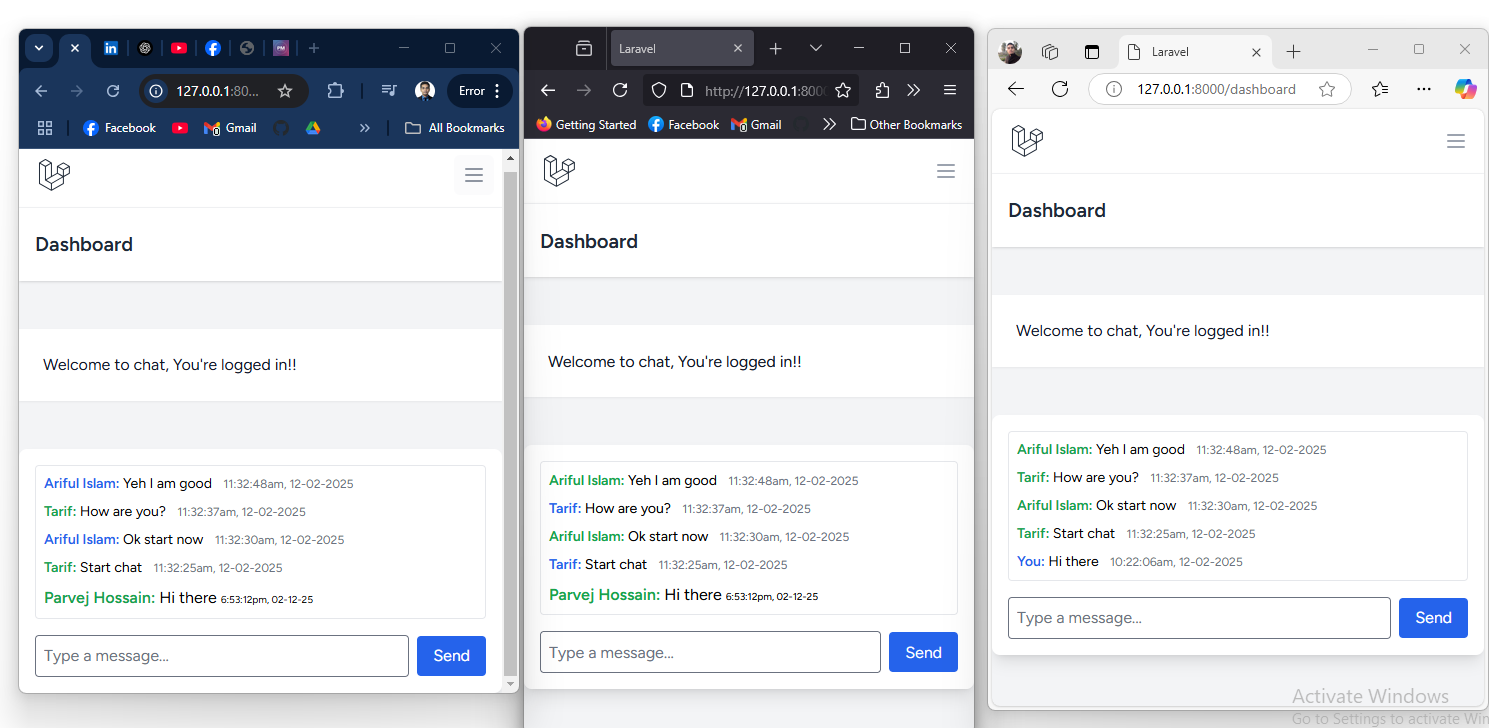
</x-app-layout>After that login to application from three individual browsers, you can also use incognito mode. You will get chat screen. If everything goes well, you are good to go. If you feel this article is helpful. You can bookmark it and share. Code for this project is available here
You can see youtube videos also