Laravel 12 Send Mail Using Queue and Job
Laravel 12 gives awesome feature to send email from system using smtp. This awesome and popular framework also provide queue functionality where you can send email instant and rest of the things will be processed in background. This is the most existing feature. This article will give clear idea how to do this. Here some of key points for sending email from laravel 12 project
- Install Fresh Laravel 12 Project
- Make Mailer Class
- Make Controller Class
- Add Route in Web.php
- Add blade File
- Add and Upgrade .env Credentials
- Run Mail Route
Let's start and explore mail features of laravel 12
1 - Install Fresh Laravel 12 Project
We will create a fresh laravel 12 project. You can use in your existing laravel 10, laravel 11 or laravel 12 project as well.
composer create-project --prefer-dist laravel/laravel laravel12-mail 12.*
cd laravel12-mail
2 - Make Mailer Class
For sending we require a mailer class. This class will be used for configuring as well as for sending data to blade view file. Here below is the command for creating mailer class
php artisan make:mail SubscriptionMail
Subscription Mail
namespace App\Mail;

use Illuminate\Bus\Queueable;
use Illuminate\Mail\Mailable;
use Illuminate\Mail\Mailables\Content;
use Illuminate\Mail\Mailables\Envelope;
use Illuminate\Queue\SerializesModels;

class SubscriptionMail extends Mailable
{
    use Queueable, SerializesModels;

    private $user;

    /**
     * Create a new message instance.
     */
    public function __construct($user)
    {
        $this->user = $user;
    }

    /**
     * Get the message envelope.
     */
    public function envelope(): Envelope
    {
        return new Envelope(
            subject: 'Subscription Mail',
        );
    }

    /**
     * Get the message content definition.
     */
    public function content(): Content
    {
        return new Content(
            view: 'mails.subscription',
            with: [
                'user' => $this->user,
            ]
        );
    }

    /**
     * Get the attachments for the message.
     *
     * @return array<int, \Illuminate\Mail\Mailables\Attachment>
     */
    public function attachments(): array
    {
        return [];
    }
}
3 - Make Controller Class
We will call mail class from controller. So it's time to create a SubscriptionController class.
php artisan make:controller SubscriptionController
namespace App\Http\Controllers;

use App\Mail\SubscriptionMail;
use App\Models\User;
use Illuminate\Support\Facades\Mail;

class SubscriptionController extends Controller
{
    public function sendMail()
    {
        $user = User::first();

        Mail::to('[email protected]')->queue(new SubscriptionMail($user));
    }
}
4 - Add Route in Web.php
Add necessary route to routes/web.php file
use Illuminate\Support\Facades\Route;

Route::get('/subscription', [\App\Http\Controllers\SubscriptionController::class,'sendMail']);
5 - Add blade File
As we are using html mail format and given blade in our mailer class, so now we will create a blade file at resources/views/mails/subscription.blade.php
<!-- resources/views/emails/welcome.blade.php -->
<!DOCTYPE html>
<html>
<head>
<title>Welcome to Our Platform</title>
</head>
<body>
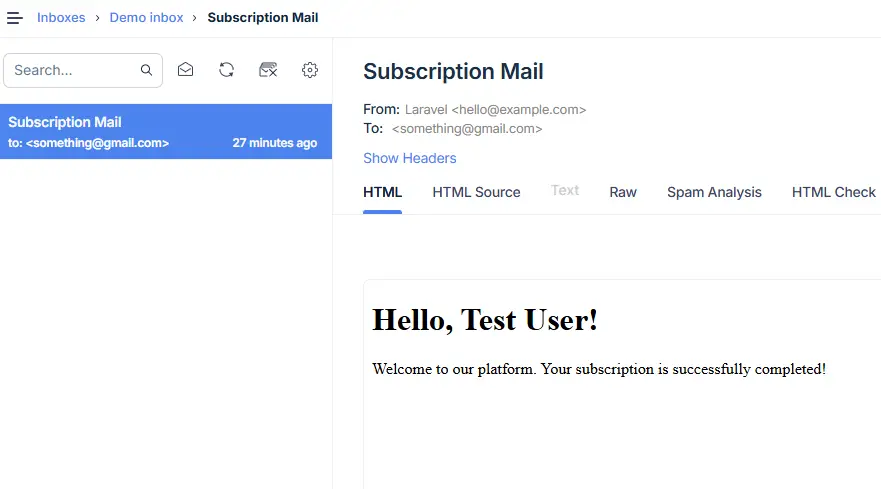
<h1>Hello, {{ $user->name }}!</h1>
<p>Welcome to our platform. Your subscription is successfully completed!</p>
</body>
</html>
6 - Add and Upgrade .env Credentials
We are using smtp and for sending mail we will use queue features. Here is necessary configuration for smtp. Change your .env according to need
QUEUE_CONNECTION=database

MAIL_MAILER=smtp
MAIL_SCHEME=null
MAIL_HOST=sandbox.smtp.mailtrap.io
MAIL_PORT=2525
MAIL_USERNAME=be2xxxxxx
MAIL_PASSWORD=5b0fyyyyyyyy
MAIL_FROM_ADDRESS="[email protected]"
MAIL_FROM_NAME="${APP_NAME}"
7 - Run Mail Route
We have successfully completed all the steps and ready to go. Here for running project and sending mail we need to run two commands in different terminal. After that hit url http://127.0.0.1/subscription in browser.
php artisan serve
php artisan queue:work
Here is the mail received in inbox. You may use google smtp or papercut mail or mailtrap.